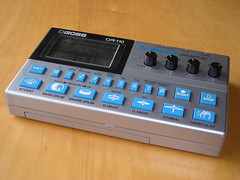
the boss dr-110 is not too disimilar to the 606 in sounds and function, and both being analogue drums machines. but the dr-110 doesnt have individual level control for each voice, and has even less storage space for user patterns. it also doesnt have the tom sounds of the 606, but makes up for this with a clap, and on top of that its a beast waiting to be tweeked!
being an analogue drum machine, some of the resistors that shape the sounds can be replaced with pots to vary them. all these modifications came from two sources, dave magnuson, whose web page has been down for a while and a guy called rob. alot of daves mods featured voltage control circuits, but i decided not to install them since i have no real need for them.
theres a zip of mht files of his site in a link in this thread on electro-music forums and some more tips. the files also cover master sync input and trigger outs for each voice. when i figure out how to make files downloadable, i’ll host it here as well if no one minds.
basically, all you do is flip over the dr-110 and remove the 3 screws from the case, and the screws on the inside securing the pcb. the mods require locating the resistors and removing them, and replacing the resistor with 2 wires long enough to reach where you need them, and attached to a pot.
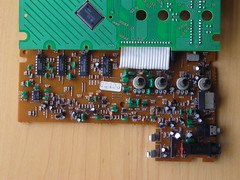
click the picture to view see the notes on the resistor locations.
bass drum:
these two mods will produce some seriously booming bass kicks! adjusting r70 produces a constant throbbing when all the way up. robs original tip was to place a 10uf capacitor across r70, but i found a 470ohm pot gives a nice way to adjust it. r86 gives a little extra decay and tone control over the stock sounds. i have found though, that driving the bass will drown out and muffle the snap of the snare if you’re not adding individual outputs.
r86, decay/tone – 47k pot (dave magnuson)
r70, bass ooomf! – 470 ohm pot (rob)
snare drum:
these two pots sound great enough as it is, however robs suggestions had a few more, but i like the wide variety of sounds these produce, from snares to tom like sounds.
r81, snap level – 47k pot (dave magnuson)
r76, impact pitch – 47k pot (dave magnuson)
hi-hat:
the decays on the hi hats go right the way down to kill the sound, but i omitted the resistor in series to get it down that far. same with the cymbal, massive decays to no sound at all.
r12, hi-hat filter – 47k pot (dave magnuson)
r10, hi-hat pitch – 47k pot (rob)
r20, open hi-hat decay – 1meg pot (dave magnuson)
r53, closed hi-hat decay – 47k pot (rob)
cymbal:
r16, filter - 1k pot (dave magnuson)
r44, decay – 1meg pot (dave magnuson)
clap:
r113, decay – 10k pot (rob)
r114, phaser/filter – 47k pot (dave magnuson)
r115 tune – 47k pot (rob)
the next step was to midify the machine. the user patterns are limited to 16, and theres 16 presents as well, so having midi control over the drums was an ideal method to over come this. i’ve used a couple of the highly liquid boards before in other projects, but after kuk over came the issues i had of getting the arduino to listen to midi messages, i’ve been trying out different things with that instead.
the code kuk came up with is perfect for this project, but there was slight adjustment due to the hardware i was used. it provides 8 midi note triggers that responds to note on and note off. since theres only 6 drum sounds to the dr-110, and accent, that left me with another spare trigger to use for external devices. there are two 1/4″ jacks on the face plate, one is the audio output, the other can be used for the standard accent trigger output that comes with the dr-110, or switched to provide the output of the 8th trigger from the arduino, which comes in handy. the switch is located inside the case at present, but i’ll probably add a toggle switch on the face plate to select either of the two.
using a full arduino board would have been a bit of a waste, so i knocked up a standalone version on a piece of strip board with a spare atmega8 i had. i burned the boot loader, and uploaded the sketch to a full arduino board, then removed the chip and inserted it into a dil socket mounted on the strip board.
the buttons on the dr-110 are actually a matrix of switches instead of individual connections. looking at the button, or digital pcb, you’ll see the copper pads of the switches. there are two point that get connected by the rubber buttons which have carbon pads under them. theres a flower/petal shaped copper pad and a surrounding circle of copper.
if you trace the pads back you’ll find they have plated through hole via’s on the pcb, which makes perfect points to solder to to avoid having to solder onto the pads directly, leaving them free to be used as normal when the case is replaced. each drum sound and the accent have individual points to solder to on one side of the pads, and there are two common points for the other side for each of the drum sounds.
the closed hit hat, open hit hat, snare and bass are all linked to a common point, and the clap, cymbal and accent are linked to each other at another common point.
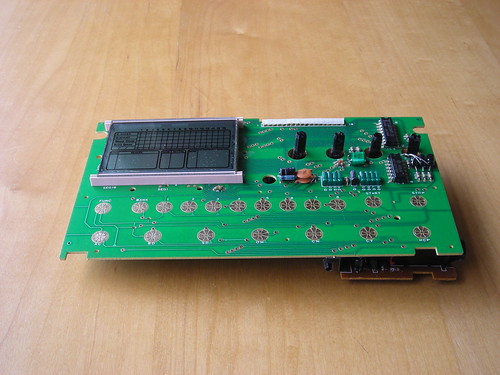
click the image to see the points.
each output from the 7 digital pins of the atmega/arduino which are used for the drum sounds, are connected to the base of a 2n3904 npn transitor via a 100k resistor. the 2 points of the ads are then connected to the collector and emitter of the transistor. make sure you ground the arduino circuit to the dr-110 though, otherwise you get some evil noise.
instead of stealing the 5v supply from the dr-110, the strip board has its own 5v regulator, which is fed from the 9v supply at the top right of the face plate, which also feeds the dr-110.
there is a slight variation to the schematics and code that kuk made. i used the 6n138 optoisolator as i had them to hand, and used one of the digital pins to feed it the 5v supply it requires. by doing this, when the atmega8/arduino powers up, it initializes the code, then powers up the 6n138. this avoids any problems with the chip receiving midi data before its ready and ensures it works without having to unplug the midi cable first. it only takes a few milliseconds to do this, but if it gets midi data before its ready the code wont respond properly.
September 27th, 2009 - 2:55 am
Hey, did you have any issues with the R76 snare mod?
I’ve had to add in a switch to cut that mod out of the circuit because when it’s in, there is a constant low tone being generated.
October 4th, 2009 - 11:18 am
not on the snare no, but the bass decay mod self oscillates at about 3/4 the way round the pot. makes for some great sub basses though.
some of the mods required a resistor in series which in some cases i didnt add, but dont have the files to hand. did you check that?